I had few hiccups while setting up my OAC instance. Learned a lot from these mistakes and would always recommend to read the document first and understand the pre-requisites before you get your OAC up and running
There are various blog posts that talk about how you can get started with OAC. The blogs that helped me to get started are Blog 1 (blog post at Rittman Mead and this post also has information about how to setup the https for your OAC instance) and Blog 2 (This particular blog helped me with the access rules that need to be enabled to get things to work)
Apart from these, the two things where I was stuck and probably would help others if you face the same issue
- Even though I have created DBaaS and have started the service, my OAC still pop-up with the message that the pre-requisites are not met. All I did was to open up the ports (http, https, dbconsole, dblistener) and post that I was able to create the OAC instance. From your
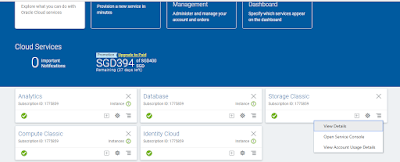
From your Dashboard, do as shown in the below screenshot
Click on "Open Service Console" and perform the step as shown in the below screenshot
Click on "Access Rules" and ensure that all those marked are enabled as per the below screenshot
Once this is done, you should be able to launch the "Create Analytics Service"
- While creating the OAC instance, remember to use the rest endpoint URL for storage directly copied from the accounts section. The format would be {REST endpoint URL}/{container}. I have named my container "beyondessbase". So, my storage container format would be {REST endpoint URL}/beyondessbase. Remember that the user id and password would be your cloud account.
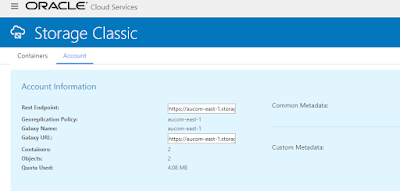
You can get the REST endpoint of your storage container navigating as below
Click on the hamburger icon and click on "Dashboard". You would see all your created instances below
Click on "Open Service Console" and you would land to as below
Click on the "Accounts" and you would get the REST endpoint. This is the rest URL that you should use followed by the container. in my case, it's the {REST endpoint}/beyondessbase1. Though I have two containers, I was using beyondessbase1 for my OAC instance
I also had another issue of using http for my OAC instance which I don't like it. Becky has helped with a link to a post on how to fix that which can be found at the link blog post mentioned before as Blog 1
After all that is done. I am finally up and running with OAC. I will shut down the instances, for now, to use it tomorrow. Not sure what challenges I will encounter once I fire up my OAC instance tomorrow. Till then, Goodbye for now...
Remember to select the type of OAC that you would like to have. It can be Standard, Data Lake or Enterprise Edition
Happy Learning!!!


Comments
Post a Comment